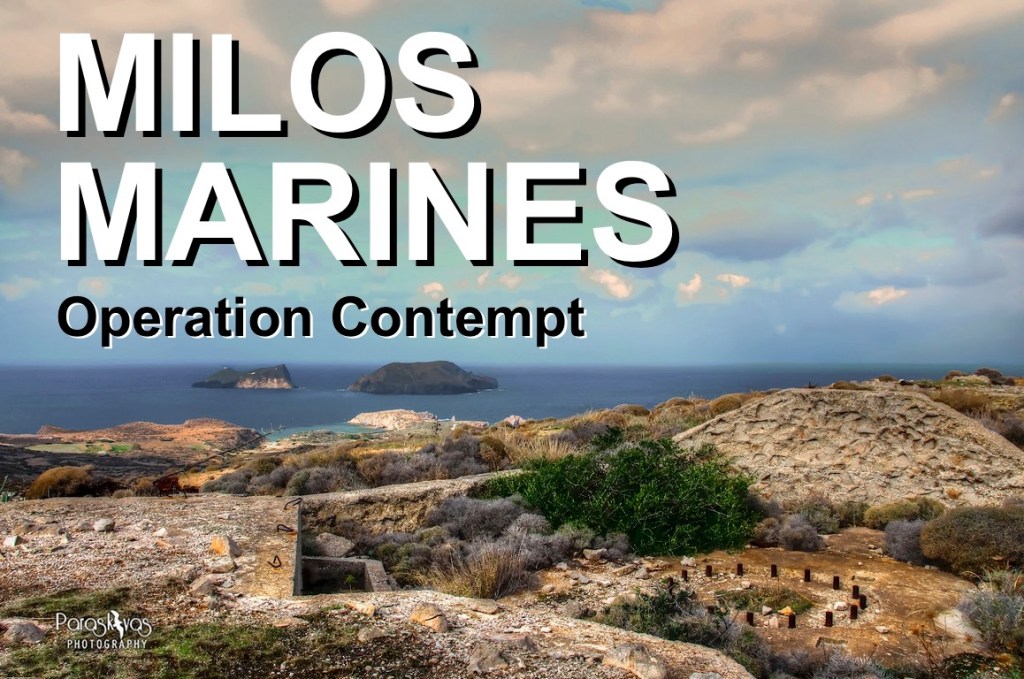
A version of this article entitled ‘Milos Marines’ was first published in the February 2023 issue of Britain at War magazine, Key Publishing, UK.
Inspired by a memorial plaque commemorating four Royal Marines lost during a WWII Commando raid on a German radar site on the Greek island of Milos, Ross J. Robertson embarks on a quest to unravel the details surrounding the mission and the remarkable stories of those who participated in it.
Spurred on by the threat of being cut off from the Fatherland by the relentless Red Army advancing through Romania towards Bulgaria (both former Axis allies) 1, the Germans started pulling out of mainland Greece in earnest in late September and early October 1944. 2 In the wake of a ruthlessly oppressive occupation, Athens finally witnessed its long-awaited liberation on the 12th October. But the occupying force left behind a seething cauldron of internal political chaos, dripping with a thirst for vengeance.
The bitter power struggles between Greek resistance groups – the royalists on the right and the republicans and communists on the left – overshadowed all but the briefest elation of being liberated. Culminating in ‘the December events’ (Dekemvriana), when shots were fired on 3rd December as communist demonstrators gathered at the foot of Parliament at Constitution Square (Syntagma), resulting in as many as 30 citizens killed and over 100 wounded, the country spiralled into a bloody civil war that endured for five agonising years.
Meanwhile, it is a little-remembered fact that under Hitler’s orders, some 26,000 German 3 and 10,000 co-belligerent Italian soldiers fiercely clung to control over crucial Aegean islands like Crete, Rhodes, Lemnos, and others. Even in the face of Royal Navy bombardments, RAF air raids, and valiant liberation attempts by the Sacred Band (Greek Commandos), these isolated garrisons remained resolute, if not entirely fanatical. It was not until the formal German surrender in early May 1945 and the undeniable collapse of the Third Reich that they finally relented.
The Island of Milos
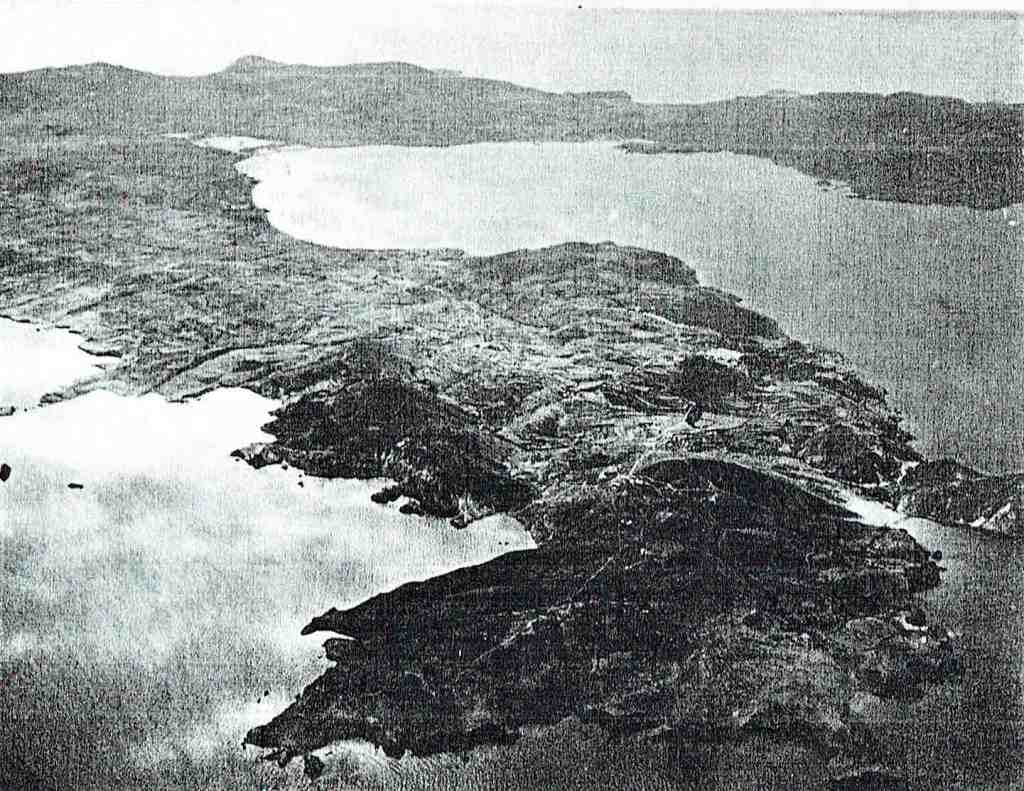
During the occupation, the Aegean island of Milos [also spelt Melos] transformed into a robust German fortress, exploiting its strategic position and the invaluable, naturally sheltered harbour of Adamas Bay. 4 In October 1944, it stood resilient with a small garrison of 650 men, commanded by the determined Cmdr Bernhard Kühn. While the Germans on the mainland were in full retreat northwards, he had been especially flown in from Thessaloniki to fortify the island’s defences. His orders from the German Commanding Admiral, Aegean, were emphatic: “The island garrison was to defend itself to the last shell,” setting the stage for a dramatic and unwavering stand. 5

The island boasted an airfield and a complementary pair of radar installations. Named after the mythical Norse goddess with nocturnal vision, the Freya radar system could detect aircraft from a staggering distance of 160 km (100 mi). While the Würzburg-Riese radar had a shorter range at 60 km (37 mi), its unmatched precision allowed automatic target tracking and fire control. Additionally, Milos bristled with heavy 150 mm (5.9 in) coastal gun batteries, 20 mm (0.78 in) and 88 mm (3.46 in) anti-aircraft gun emplacements, pillboxes, bunkers, trenches, and minefields. This formidable defence made it clear that liberating Milos from German control would necessitate a substantial landing force, far beyond the logistical simplicity of a commando raid.
FREYA RADAR: Operating at a wavelength of 2.40 m and with a power output of 15-20 kW, the Freya radar’s relatively small mattress antenna array could measure direction and distance (but not accurate height) of incoming aerial targets up to 160 km (100 mi) away, and surface ships even further afield than that. It was manually pivoted on a tetrapod base and could be made mobile for easy deployment. Freya units were normally used in conjunction with Würzburg radar units (various variants) – the former offering early warning, the latter used to pinpoint targets with greater accuracy. Built by a 1930’s start-up company called GEMA (Gesellschaft für Elektroakustische und Mechanische Apparate), only 8 units were in service at the beginning of the war. By war’s end, over 2,000 Freya systems (various variants) had been deployed. The Kriegsmarine (German Navy) Freya unit on Topakas (type FüMO2) had a single cabin (standard) and only 1 antenna (which could be raised and lowered) with 4 rows of vertical dipoles with 16 in each row.
WÜRZBURG-RIESE RADAR: Looking decidedly modern with its 7.5 m parabolic dish, the FüMG 65 Würzburg-Riese (Giant Würzburg) had a short wavelength of 54 cm (i.e. state-of-the-art microwave), meaning that it had high resolution. With 8 kW of power, it had a range of 60 km (37 mi) and (like the smaller Type D variant) had an advanced conical scanning system which allowed automatic target tracking with a range accuracy of 15 m (49 ft) and azimuth and elevation accuracy of 0.1 to 0.2°. This allowed fire-control (i.e. gun-laying) capability and many were used to automatically direct AA flak fire. Built by Telefunken, about 1,500 Giants (4,000 of all Würzburg variants) were deployed during the war. They were also used postwar during the early stages of radio astronomy.
Nevertheless, the audacious Sacred Band, led by Col Andreas Kallinskis, and a daring thirty-man contingent from Force 124, a British Special Forces group comprising SAS and SBS fighters under Col John N. Lapraik, unleashed a dramatic assault on 26th October codenamed Operation Contempt. Utilising the neighbouring island of Kimolos as a launching point, they struck the northeast corner at Tria Pigadia, Voudia, and Apollonia.
Documented in the German Naval Staff’s Operations Division War Diary, the island chief, Cmdr Kühn, urgently reported the onslaught at 06:54 hrs, citing “Strong naval forces with one aircraft-carrier.” By 13:00 hrs, he communicated “Continuous air and naval artillery attacks on the heavy anti-aircraft batteries.” The day’s final encoded radiogram at 18:00 hrs defiantly declared, “Secret matters destroyed, security of the codes guaranteed. We’ll hold up to the last. Long live the Führer!”
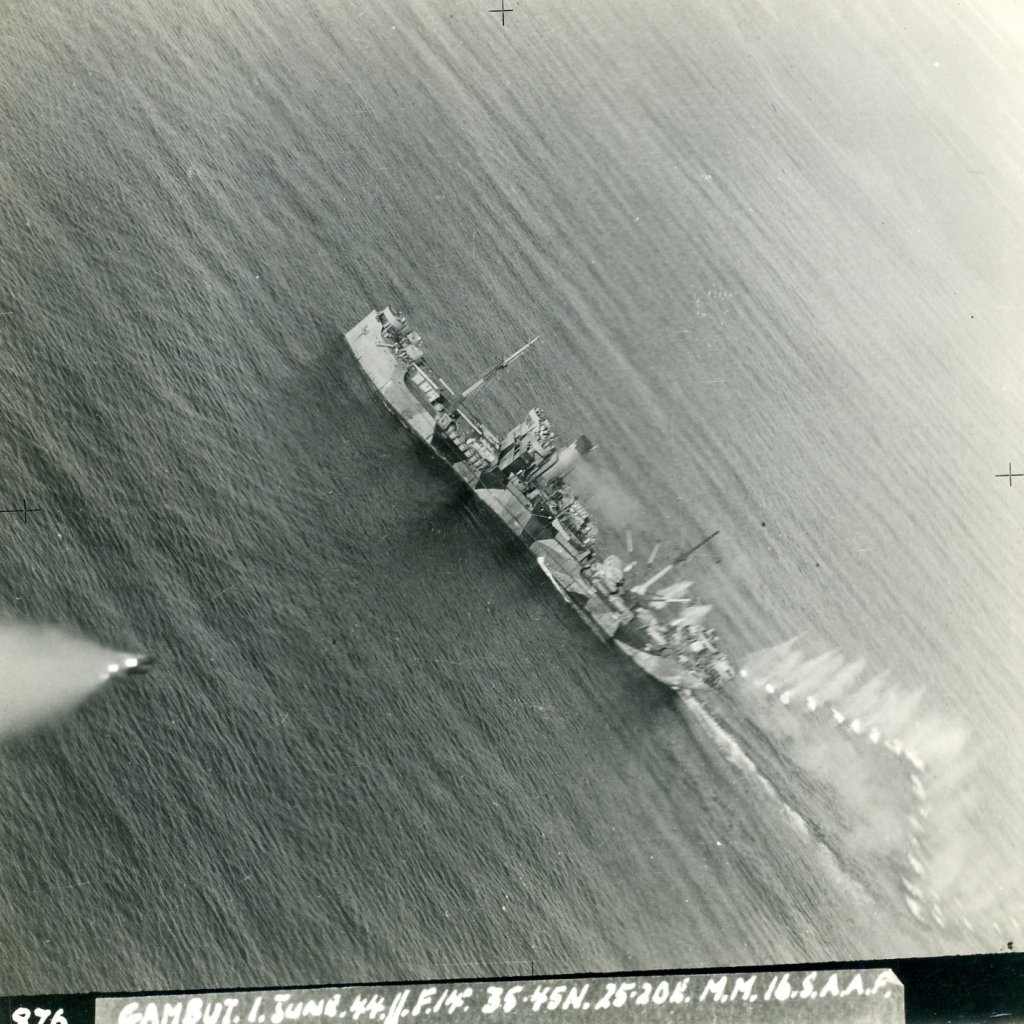
The unrelenting onslaught would continue in the ensuing days. The ruthless barrage emanated from the light cruiser HMS Aurora (21) and the destroyers HMS Tetcott (L99) and HMS Tyrian (R67). Aerial fury was unleashed by 459 Squadron RAAF Baltimore bombers from Berka (Libya) 7 and 800 Squadron FAA Hellcats soaring from the escort carrier HMS Emperor (D68). In a previous strike on the 19th, HMS Emperor’s Hellcats had obliterated the Würzburg-Riese radar on Akrotiri hill (Cape Provatas). Now, their mission was to intensify the assault, hoping to break the Germans’ resolve. On the 29th, eight Hellcats, joined by eight 603 Squadron RAF rocket-firing Beaufighters from Gambut (Libya), targeted anti-aircraft positions and a concrete-embedded gun emplacement on the cliff. 8Although this specific assault proved unsuccessful, a relentless attrition was taking its toll on the enemy, yet they defiantly held their ground.
Despite inclement weather, the cruiser HMS Black Prince (81) entered the fray, unleashing its own relentless bombardments upon German positions. In a daring move on the 29th and 30th, a formidable naval shore party of approximately 150 men, under the direction of Cmdr Stratford H. Dennis, stormed the southern shores at Probato Bay. They rendezvoused with Sacred Band commandos and other forces that had been clandestinely landed. 9 This surge in ground forces enabled the expulsion of Germans from coastal areas, particularly to the east and south, confining many to the defensive stronghold of the main town, Plaka. Yet, despite these efforts, the island remained a battleground, far from the liberating victory the Allies sought.


Despite relentless air and naval bombardments, the coastal battery at Lakida Point (aka Trachilas, on the eastern entrance to Adamas Bay), comprising four turreted 150 mm long-range guns, remained impervious. This stronghold granted the Germans the ability to target any approaching ship with impunity. 10 On 2nd November, Capt. Dennis M. Lees, commander of HMS Black Prince, described the stalemate, stating, “Emperor continues to perform magnificently with his aircraft, but neither his heavy attacks nor my pea-shooters make any dent in the 150 mm battery, except to force them to keep their heads down.”
The realisation eventually dawned that overcoming the formidable German resistance and seizing control of the entire island without substantial reinforcements was an insurmountable challenge. Consequently, an order for the withdrawal of nearly all land and naval forces was issued on the 3rd and smoothly executed during the nights of the 4th and 5th. The attack had ultimately petered out.
The Germans had won the first round.
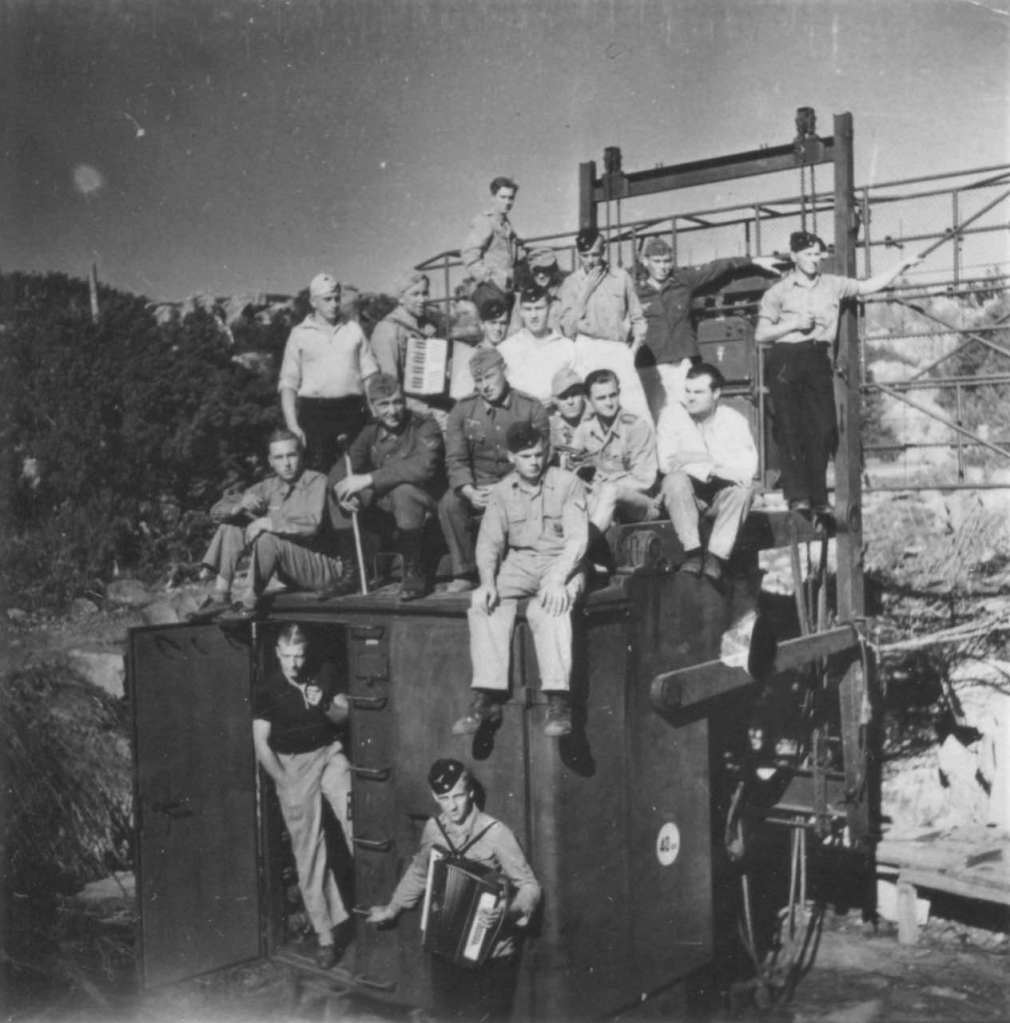
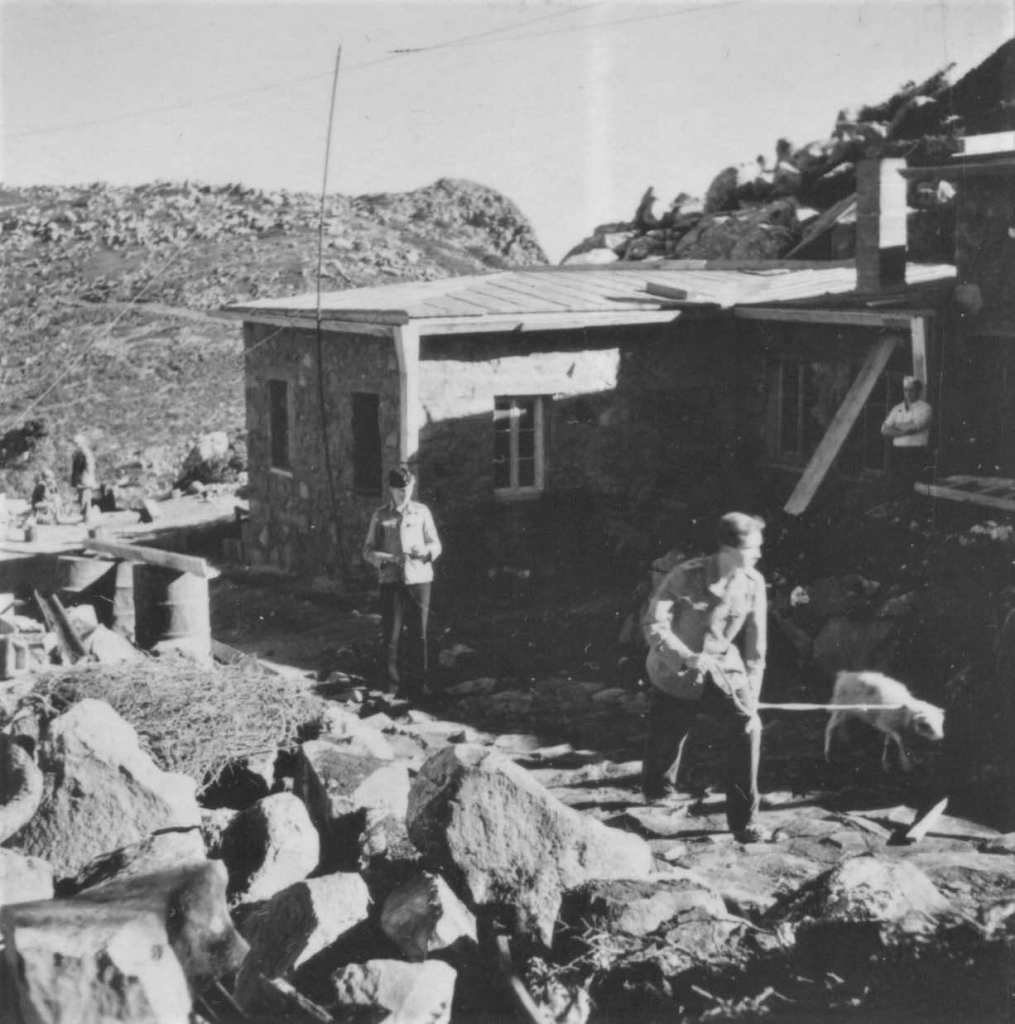
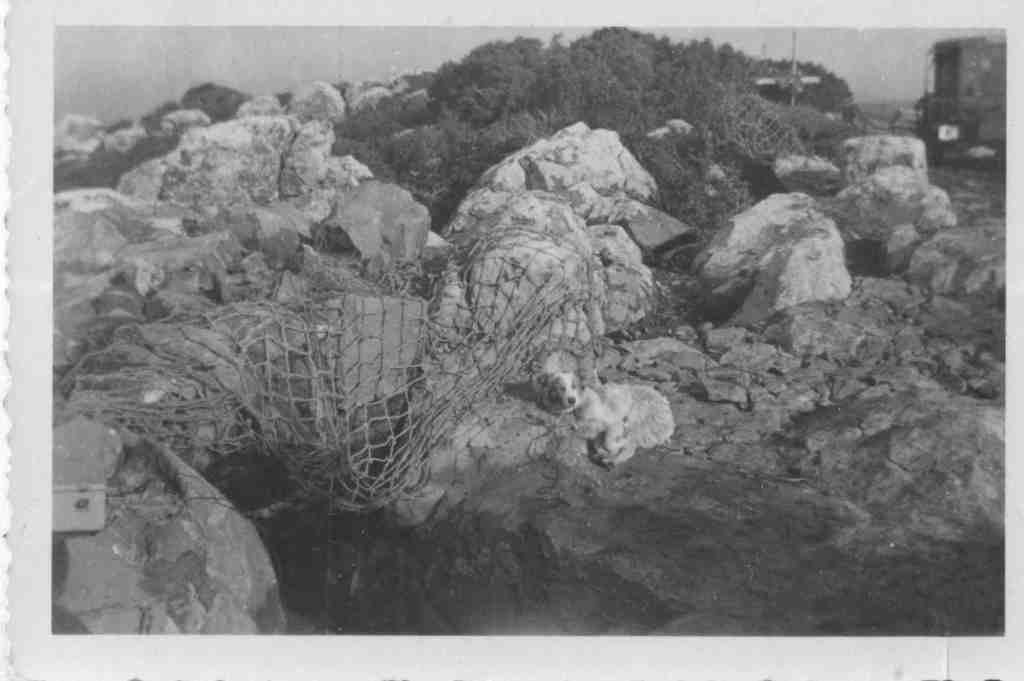
Source: Paraskevas Karvouniaris ©
Source: Paraskevas Karvouniaris ©
Source: Paraskevas Karvouniaris ©

Round II: Time for the Big Guns
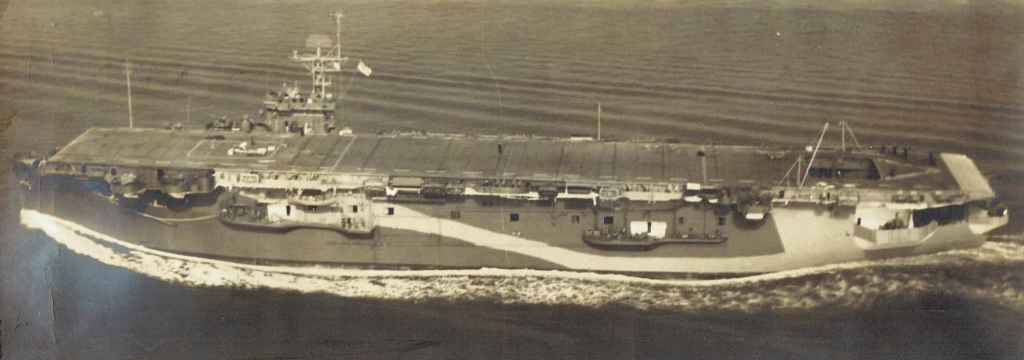
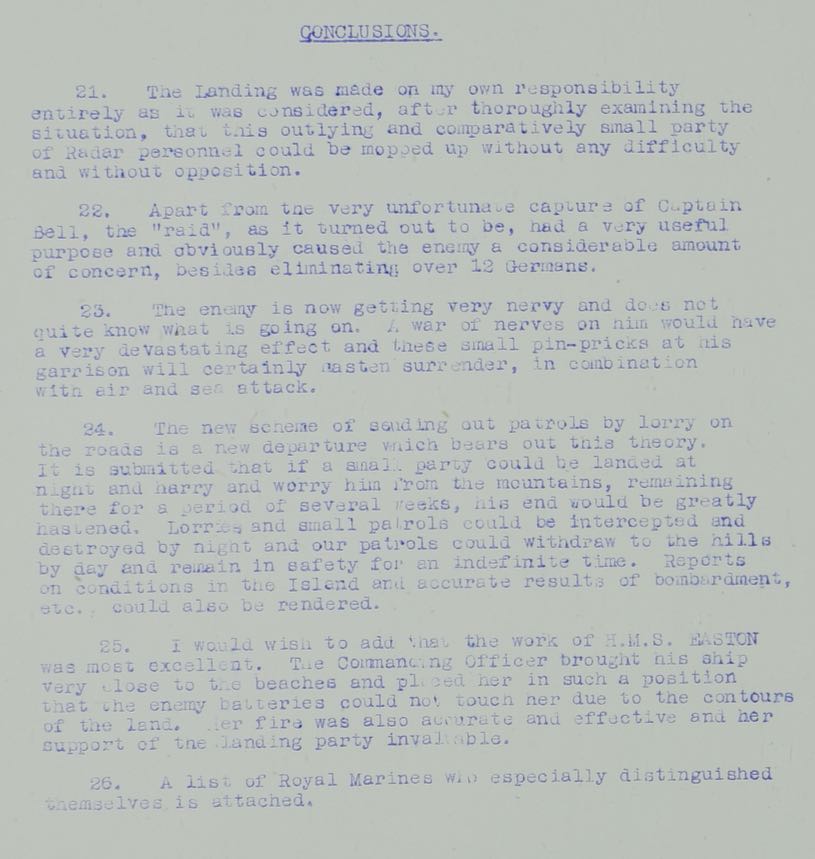
The battle had become synonymous with persistence, and on 14th November, a more formidable engagement loomed. Directed by spotting aircraft from the carrier HMS Emperor, a Swordfish, piloted by Lt John ‘Tony’ Shipperlee with WO Evans as the observer and wireless operator, guided the powerful 355 mm (14 in) artillery on His Majesty’s battleship King George V (41).

Source: US Navy ©
Unleashing 30 rounds from a staggering range of 27.4 km (30,000 yards) onto the coastal battery at Lakida Point, the intent was, as always, to compel surrender through an overwhelming display of firepower. However, the bombardment’s accuracy left much to be desired. Lt Shipperlee later recounted in his diary that the gunnery officer had overlooked ‘laying off’ the ship’s speed while adjusting aim between salvos, resulting in all shells missing their mark. 11 Despite this, the Lakida battery defiantly responded with a single ‘clearing’ salvo, underscoring their unyielding determination.
Round Two had been squandered away by incompetence. The stage was now set for a more unconventional approach to confront the enemy.
Round III: Send in the Royal Marines!
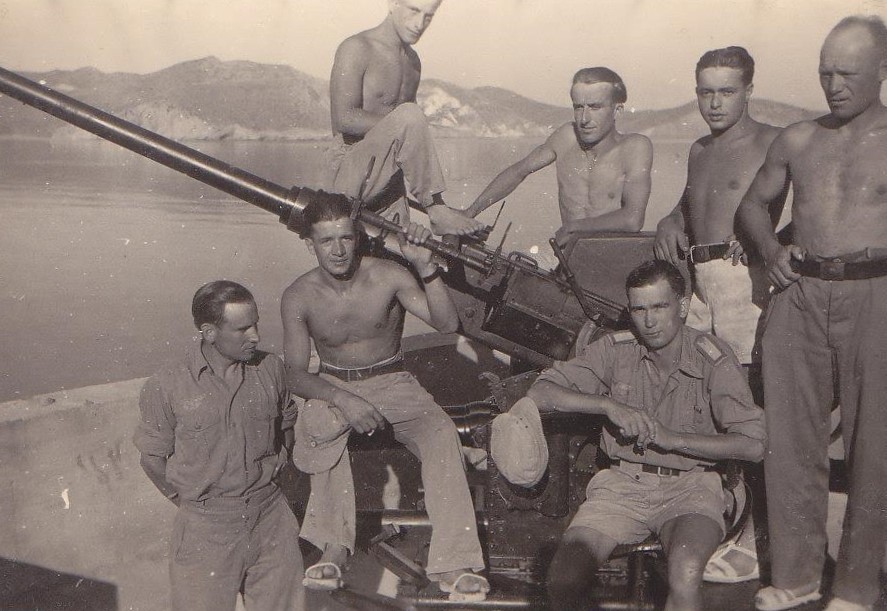
At 14:30 hrs that same day, HMS King George V sailed away from Milos, destined for the Far East via the Suez Canal. This only left the hunt class destroyer, HMS Easton (L09), to press on with the mission. Aboard, Haddock Troop, a bold contingent of fifty Royal Marines assigned to a ‘Special Assignment,’ led by Cmdr Dennis and Capt. Arnold Bell, embarked on a daring endeavour. In the words of their Troop Sgt Sid Prevett, it had been decided that they should “have a go at destroying the radar station on the southwest corner.” 12
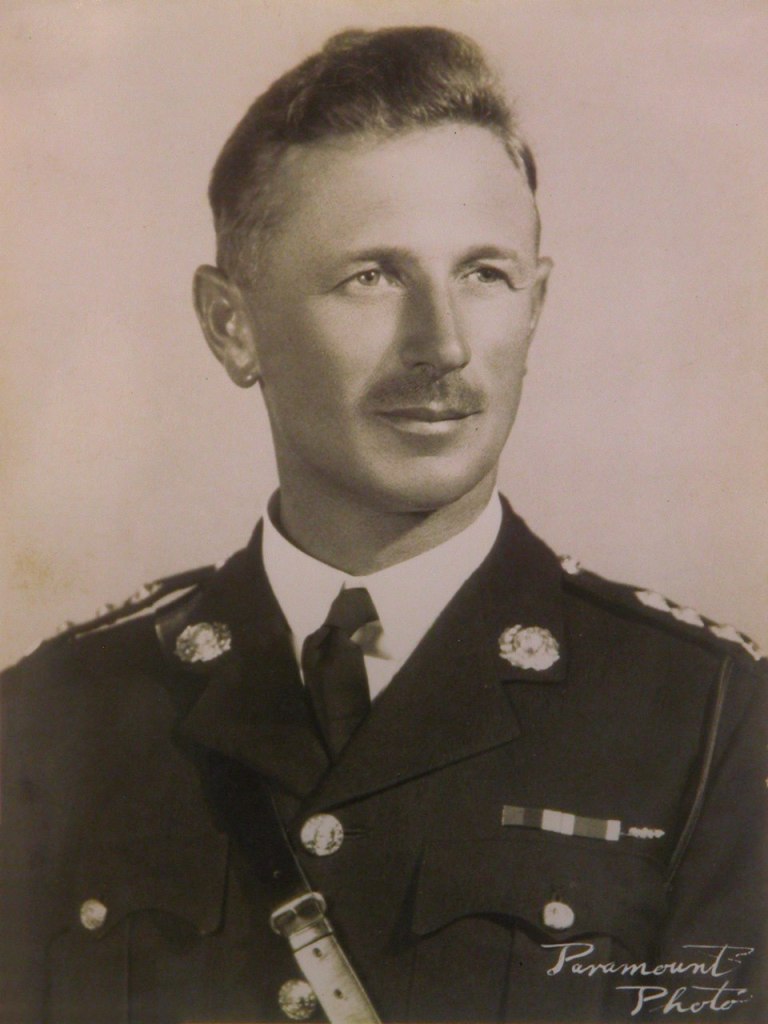
CAPT. ARNOLD BELL joined the Royal Marines in January 1926, just 3 days before his 18th birthday. A keen soldier, he quickly progressed through the ranks, becoming an instructor and part of the Royal Marine contingent forming the Royal Guard at St. James Palace in August 1935. During the war, he achieved the rank of Sgt Major in 1940 and was twice mentioned in Dispatches. He took part in the 1943 Sicily landings and attained his commission in January 1944. He was assigned to HMS Nile, a command shore base at Ras el Tin Point in Alexandria, Egypt, where he led a special detachment of Royal Marines known as ‘Haddock Troop’.

SGT SID PREVETT, whose father served in WWI in the Queen’s (Royal West Surrey Regiment) and was killed in Gallipoli in 1915, had joined the Royal Marines in February 1927 to further his education and help his widowed mother financially. In 1935, he transferred to New Zealand where he met and married Joan Marks. With the inevitability of war looming, he was reassigned back to the UK and his wife followed him. Tragically, their 3 year old son was killed during a Luftwaffe bombing raid on Scarborough on 19th March 1941. As the war raged on, Sgt. Prevett was serving on the battle cruiser HMS Repulse (34) when it was hit and sent to the bottom of the South China Sea by a surprise Japanese air attack. The battleship HMS Prince of Wales (53) was also sunk. The attack was on December 10th, 1941 13 – just three short days after Pearl Harbor. On 17th June 1943, his 28 year old brother, Cpl Victor R. Prevett was killed in action while serving the Royal Army Ordnance Corps. Sgt Prevett was reportedly devastated by the loss. Later, on 9th October 1943, he was in the Aegean between the Greek islands of Karpathos and Rhodes on the light cruiser HMS Carlisle (D67) 14 in convoy with four Royal Navy destroyers, including HMS Panther. HMS Carlisle received four direct hits by Luftwaffe Ju-87 ‘Stuka’ dive bombers literally five minutes after the convoy’s escort of American P-58 ‘Lightning’ long-range fighters had been ordered off patrol to return to base. 15 Although HMS Carlisle did not sink, it had a propeller blown off and suffered extensive structural damage and flooding. HMS Panther was sent to the bottom. According to Sgt Prevett, of the 38 Royal Marines in the convoy, only three made it back to the port of Alexandria (Egypt) alive.
This was not their first call to action. On 4th November, Haddock Troop had been ferried to Milos on the destroyer HMS Lookout (G32) in response to what Capt. Bell referred to as “Some Jerries with a couple of big guns.” However, the operation was scrubbed as Cmdr Dennis’ 150-strong landing force was withdrawn (as aforementioned), leading to the Troop unexpectedly returning to Alexandria on HMS Black Prince.
The second opportunity on the 14th must have appeared as an opportunity too-good-to-be-true. Maps and intelligence reports detailing the Freya radar installation on Topakas (elevation 340 m, 1,100 ft) 16 were examined, and the men received briefings. Weak resistance was anticipated, a mere group of ten or fifteen technicians. Capt. Bell was to lead the primary assault team of twenty-two men, with Sgt Prevett commanding a reserve team on standby. Cmdr Dennis would coordinate the attack from a signalling party on the shore. Armed with an extra Bren gun borrowed from the reserve team, they were on the brink of leaving an enthusiastic mark on “Jerry”.
In reality, the mission lacked adequate planning, as Sgt Prevett notes retrospectively in his diary. No reconnaissance was done, leaving them unaware of the German garrison’s true strength and the challenges posed by the rocky terrain. Camouflage oversights were evident, with the easily visible Royal Marine uniforms, berets, and ‘scrubbing’ – the whitening of belts, armlets and so on. Realising this during the raid, berets were removed, whites darkened with dirt, and gaiters worn inside-out. The broad daylight disembarkation, while mindful of Lakida Point’s long-range guns, took advantage of the island’s bluffs and topography, keeping HMS Easton close enough to shore. However, with only one cumbersome ship’s boat, multiple trips were needed, exposing the men to the Germans on Topakas. All were rowed ashore by 15:30 hrs. Then the Germans watched as their attackers exhausted themselves in the arduous climb.
Nevertheless, there was an attempt at deception. HMS Easton departed, concealing itself from view on the opposite side of Topakas. The aim was to weaken the Germans before the Royal Marine assault, or, as Sgt Prevett casually noted, “Lob a few shells in to start the war!” However, it appears that the 4-inch (101 mm) guns on HMS Easton may not have been utilised for this purpose. Sgt Prevett’s diary reveals the realisation that a miscalculated pre-arranged timing for the attack would pose a serious threat to the assault team as they approached the radar installation, ready to strike.

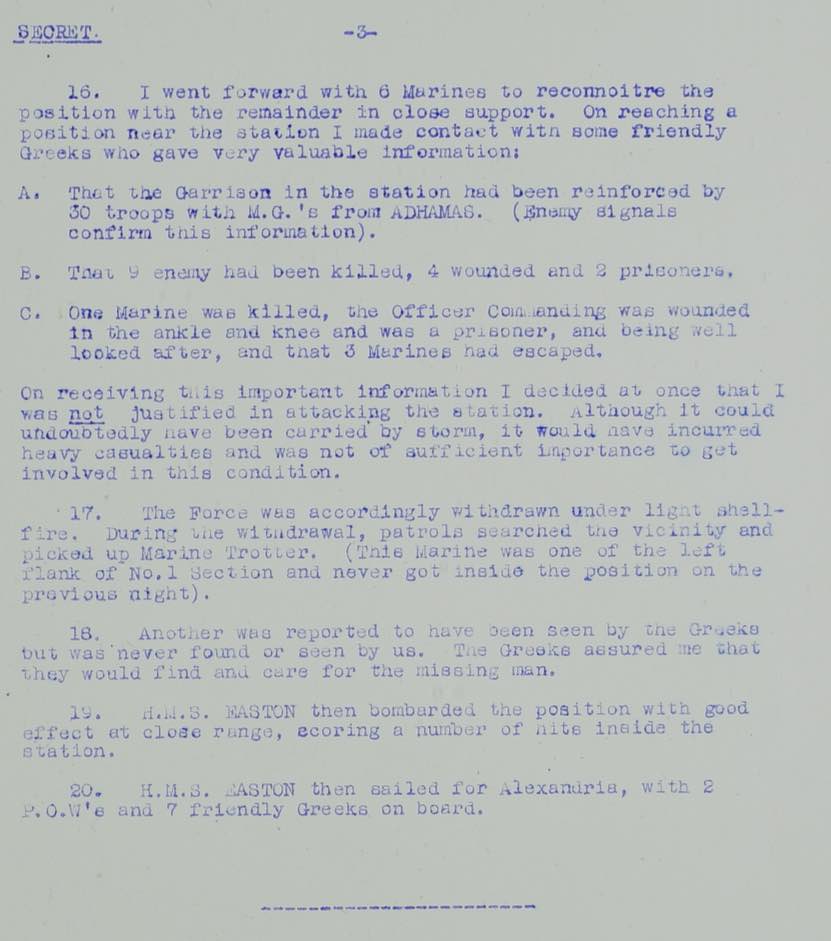
Under the cover of darkness, the Lakida battery was no longer an immediate threat, so HMS Easton returned in preparation to retrieve the shore party. From the ship’s bridge, Sgt Prevett observed “stabs of flame, mortar, and grenade bursts” ashore, signalling an ongoing skirmish. At 19:00 hrs, a phosphor grenade indicated the assault team was ready for pickup. The ship’s boat was launched and rowed ashore. Upon its return, the realisation hit – Capt. Bell and five Marines were missing, with one corporal seriously wounded. Nevertheless, two Kriegsmarine (German Navy) prisoners, Cpl Wenzel and wireless operator Adamitz, had been captured.
With the wind picking up and darkness hindering navigation, the ship’s boat took until 00:15 hrs on the 15th to recover the remaining members of the initial assault team. A meeting involving the ship’s captain, Lt Loftus E. Peyton-Jones, Cmdr Dennis, and Sgt Prevett concluded that the reserve assault team should embark before dawn. The primary objective was to rescue Capt. Bell and other Marines, but a renewed attack on the radar installation was decided on. Believing the risk of German reinforcement to be minimal due to the challenging terrain, they strategically positioned HMS Easton on the east coast. Firing starshells over German defences at Voudhia, Adhamas, and Camina to divert attention, the second landing commenced at 04:00 hrs under the guidance of Cmdr Dennis and Sgt Prevett. It took almost until daybreak to complete the landing. At first light, Lakida Point targeted HMS Easton, which had failed to conceal itself in time. A round fell short onto the landing beach, fortunately causing no casualties.
Sgt Prevett set up a defensive perimeter, deploying 50 mm (2-inch) mortars to cover the surrounding valleys. A rocky gully ascended the mountainside, providing cover for Cmdr Dennis and a six-member reconnaissance team to discreetly approach the radar installation.
However, no attack materialised. Local witnesses – goat herders and farmers from the nearby Mt. Katsipardos, conveyed that thirty Germans with heavy machine guns had reinforced the position overnight (later verified through intercepted enemy signals). The element of surprise had been totally lost, and with the now fortified enemy on high alert, contemplating a second assault would have amounted to nothing short of suicide.
Locals also said that nine enemy soldiers had been killed, four wounded, and two captured. Although Capt. Bell had sustained ankle and knee injuries, he was reportedly safe and receiving care in a deep shelter. The fate of the three others was uncertain, and the wounded corporal’s whereabouts were unknown. With limited time and no means to verify the information or take action, the reluctant decision was made to return to the landing beach in readiness for embarkation.

Source: Paraskevas Karvouniaris ©
HMS Easton risked exposure by unleashing a close-range barrage on the radar installation. Although it scored numerous hits, around thirty 35-pound shells missed their target, clearing Topakas altogether and falling toward the Royal Marines descending to the landing beach on the other side. Fortunately, the trajectory spared the Marines as the shells whizzed overhead and harmlessly splashed into the sea nearby.
As the ship’s boat commenced ferrying the second assault team back, the Lakida battery then opened fire in retaliation against HMS Easton. Dodging dangerously falling shells, the Marines rowed the cumbersome craft away from the island. Typical of Sgt Prevett’s characteristic dry humour, he notes, “It seemed to make the crew pull harder!”
At 16:30 hrs, everyone who could be on board was present, including Cpl Holland, who had been wounded, Marine Trotter, who was a missing straggler from the first raid, and seven locals seeking refuge from potential reprisals for informing on the Germans. As the wounded received care, HMS Easton steamed away, heading for the safety of Alexandria.
The third and final round had been convincingly lost to the Germans.
What really happened during the first raid?
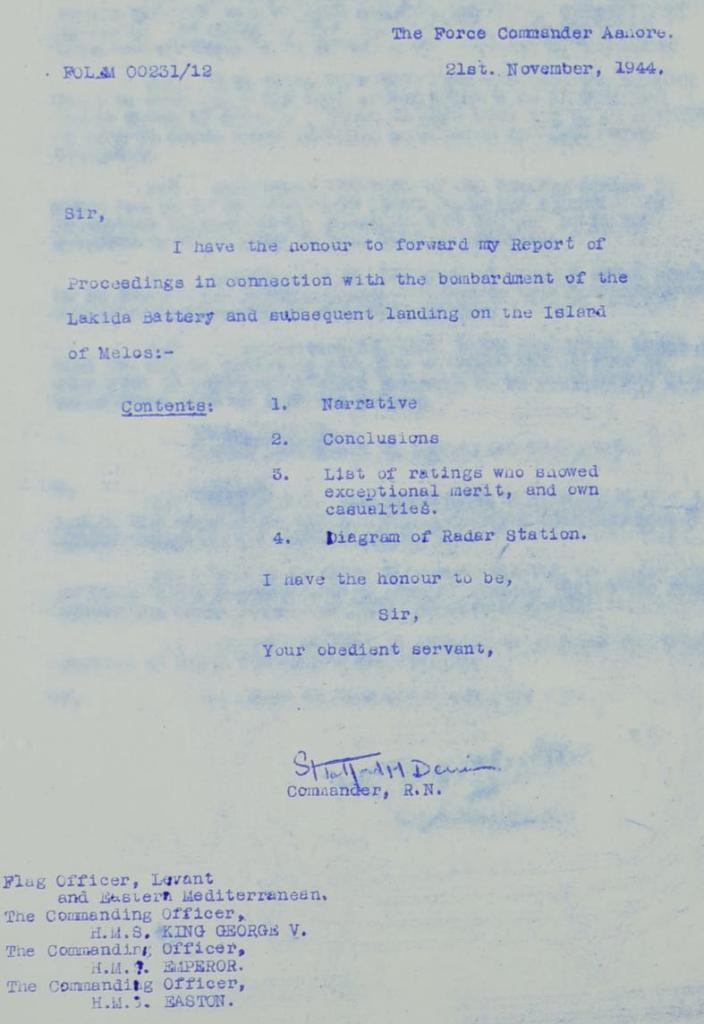
While Sgt Prevett’s Diary offers a historically significant perspective, it is inherently limited to the author’s role in the events. Further details about the occurrences during Capt. Bell’s initial raid can be found in a report submitted to the Admiralty by Cmdr Dennis, enabling a more comprehensive reconstruction of the story.
A few hours prior to departing Alexandria for Milos on HMS Easton, Cmdr Dennis was informed by Col Lapraik of the plan to land and have a small patrol “mop up” the radar station on Topakas, weather permitting. On route, Cmdr Dennis consulted Capt. Bell, proposing that the Royal Marines undertake the raid “if it had not already been dealt with by Force 142.”
The landing of twenty-two men commenced at 14:50 hrs, navigating a ravine through dense shrubbery. Contrary to Sgt Prevett’s account, Cmdr Dennis reported, “the station was bombarded by HMS Easton with a view to softening up any enemy.” Approaching the top, white flags emerged, wielded by “very alarmed” local Greek peasants.
Around 17:00 hrs, German snipers opened fire on the Royal Marines, but their shots proved “spasmodic and very inaccurate.” Capt. Bell commanded a counterattack with mortars and machine guns. The Marines advanced from the east, the main group heading straight for the barbed wire perimeter, while two smaller groups protected the flanks. They encountered and severed tripwires attached to flares and anti-personnel mines designed to launch about 1 m (3 ft) into the air before exploding in a deadly cloud of shrapnel. The Marines swiftly breached the barbed wire, but within the compound, the enemy abruptly “came to life”, unleashing a barrage of rifle fire, machine guns, and hurtling stick grenades.
The compound faced an intense assault from Royal Marine machine gun fire and grenades. A wireless transmitter hut, discovered empty, suffered point-blank Bren gun fire, obliterating all radio equipment. Following grenades, two Germans emerged dazed and wounded from a dugout and were captured. Phosphor grenades thrown into the second dugout engulfed it in smoke and flame, accompanied by audible cries and groans from within. Rifle fire claimed the lives of three Germans, while the remainder retreated just beyond the crest of the hill, from which they continued to hurl stick grenades into the compound below.
In the midst of the battle, Capt. Bell found himself tending to a fallen Royal Marine, urgently requesting a field dressing. With failing light and a clear impasse in the fight, he realised that their attempt had failed. Consequently, he ordered a withdrawal. The order was heard in his own voice, and it was also conveyed by his runner. The retreating Marines, unaware they would never see him again, fell back. There is uncertainty about whether he was hit giving the order or while withdrawing.
As the Marines neared the beach during their retreat, Cmdr Dennis met and regrouped them. It became evident that Capt. Bell and five Marines were missing. Despite an immediate search, they could not be found. Acknowledging the impossible situation, Cmdr Dennis ordered a withdrawal back to HMS Easton, with the resolve to return before first light – an oath he fulfilled.
Cmdr Dennis filed his report on 21st November 1944, reporting Capt. Bell as “Wounded and a Prisoner-of-War.” Subsequently, it was discovered that Capt. Bell had been killed instantly. Marines R. G. Bachelor, H. I. Bowkett, and W. A. Brown had also fallen. Contrary to initial information provided by the locals, the individual in the ‘deep shelter’ with leg wounds was Marine Harry Barber, who was captured and later located two months afterwards on the German hospital ship, Gradisca.
The Aftermath and Ensuing Years
Despite the camaraderie and bravery displayed during the assault on the Freya radar installation, the mission ended in total failure. However, harassment operations, especially by the RAF and Sacred Band commandos, persisted. On 5th December, the Sacred Band ambushed and killed Cmdr Kühn, the fervent Hitler supporter. However, even this loss did not deter the German forces. Unfortunately, the assassination also claimed the lives of Dr Hans Löeber, known for his sympathy toward the local islanders, and a Greek nurse. Additional attacks included ambushes on German patrols and the killing of the garrison commander at the Sulphur Mines (Theiorycheia). While these actions compelled the Germans to retreat from certain coastal areas to more defensible positions, surrender was not contemplated – only the actual end of the war would bring about capitulation.


In the early hours of 7th May 1945, the German High Command signed the initial instrument of unconditional surrender in Reims, France. The remaining 552 steadfast Germans on Milos surrendered the following day, including Oberleutnant-zur-See (the equivalent of Lieutenant in the RN) Horst Seegers, the commander of the Topakas garrison. A former Luftwaffe pilot who had served during the Battle of Britain, Seegers suffered a foot injury on the Eastern Front, leading to his transfer to the Kriegsmarine and subsequent posting on Milos in June 1944. Following the surrender, he spent four years as a prisoner of war in North Africa. Upon returning to Germany, he became a father of three daughters, each of whom later married former enemies – an Englishman, a Greek, and a Pole. Transitioning to a successful career as a tax consultant (arguably the enemy of all), Seegers eventually retired. Remarkably, he then acquired a holiday house in the village of Trypiti on Milos. Spending many months each year on the island, it became a significant part of his life. He passed away on 18th April 2010, at the age of 87.
When the war ended, Prevett retired from military service as a Colour Sgt and resettled in New Zealand with his wife, Joan. Working in the retail trade under his father-in-law, he embraced his adopted home, actively contributing to the community. He had two more children, Richard and Margaret. He passed away in October 1998 at the age of 88. Of her father, Margaret told the author: “Loyal to both King and country, dad was a Royal Marine until the end. We continue to be so proud of him.”
In 1997, Capt. Bell’s son, Ed, and grandson, Ian, embarked on an investigative journey to Milos. During a subsequent visit in 1998, Ed connected with Gregory Belivanakis, who was the local newspaper editor and author of a book and other materials about the German occupation of Milos. Ed and Gregory, accompanied by Gregory’s son, Andreas, as well as Antonis Karamitsos, a local who had left the island with the Royal Marines on HMS Easton, explored Topakas together. The following day, Ed, aided by Gregory as an interpreter, met Horst Seegers and they talked together about the events that unfolded 54 years earlier.
“I was only 4 years old when war broke out and saw little of my father. My memories of him are scant, but overwhelmingly positive. Like countless others, I had learnt to accept the loss while growing up. However, actually seeing the location of events and meeting Horst Seegers all those years later was a moving experience,” Ed explained.
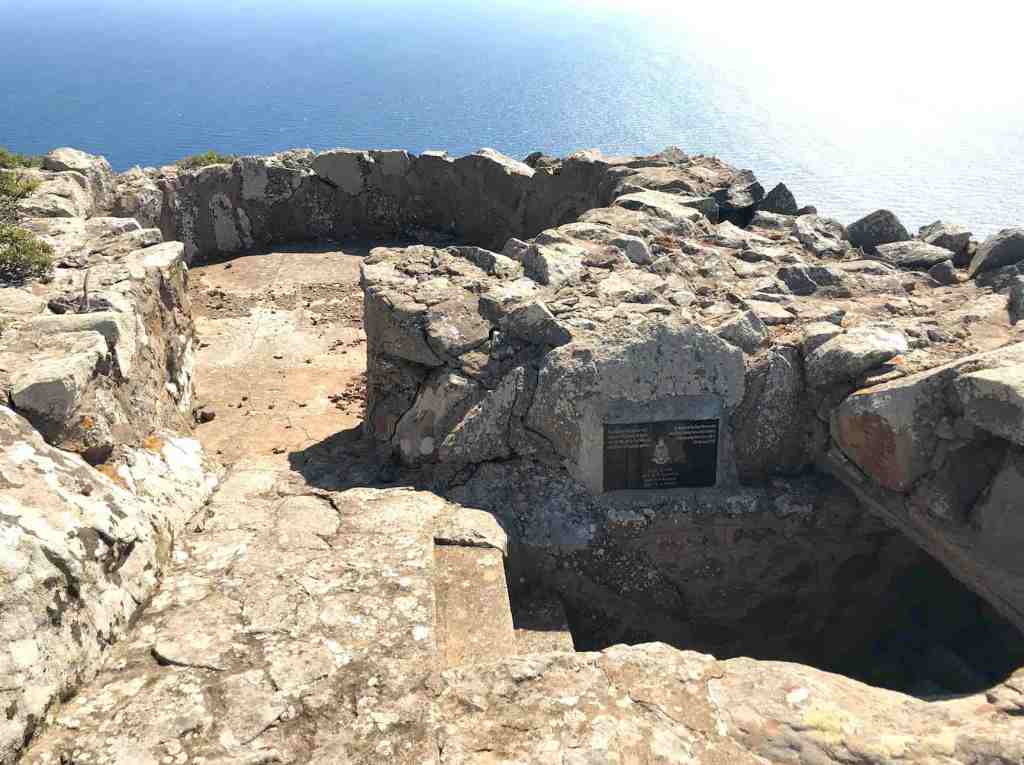
On return back to England, Ed had a commemorative plaque crafted by former Royal Marine, Alan Wright. In June 2000, he placed the plaque at Topakas, where it remains today.
It served as the inspiration for this article.
The memory of the three additional Royal Marines who lost their lives on that tragic day should not be forgotten. Alongside Capt. Bell, it is these individuals who paid the ultimate price, defending the future from fascist oppression, and in their sacrifice, they played a pivotal role in shaping the contemporary world we inhabit.

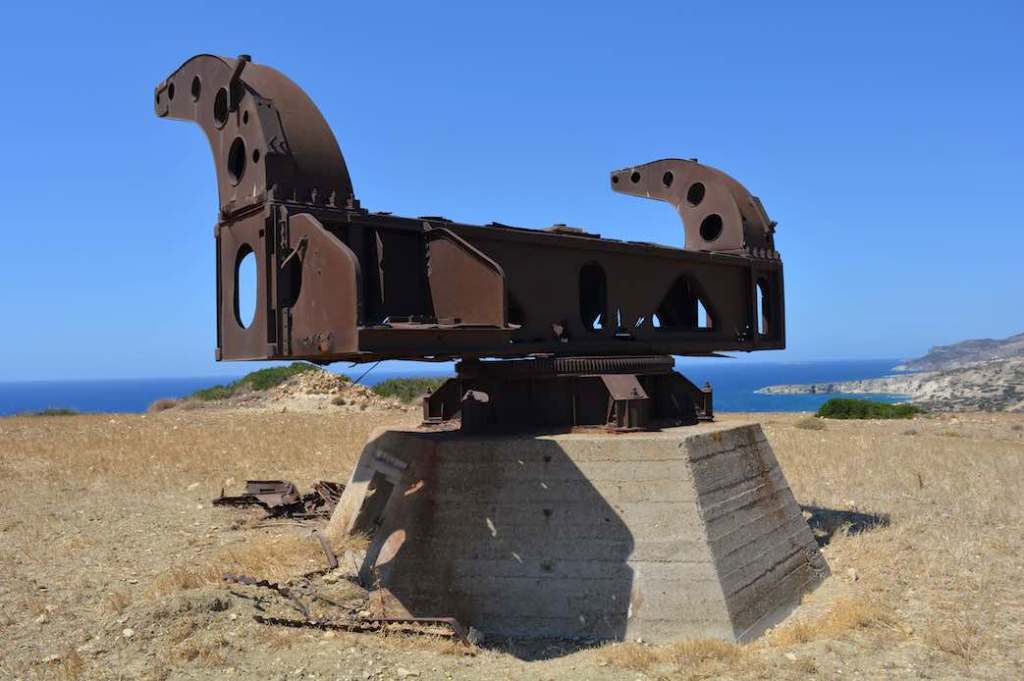
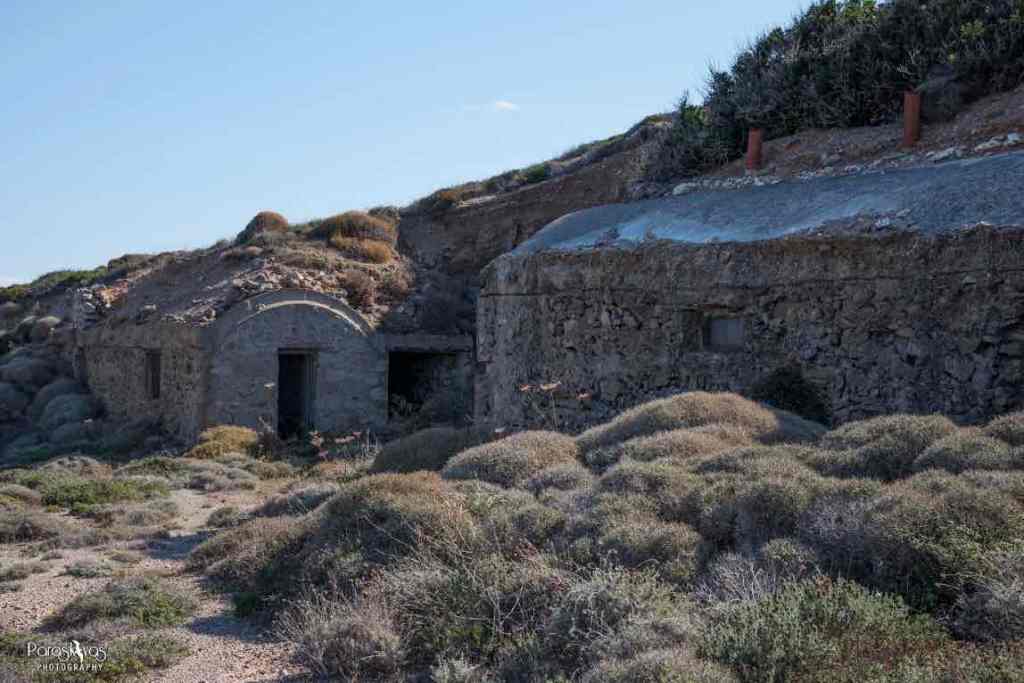
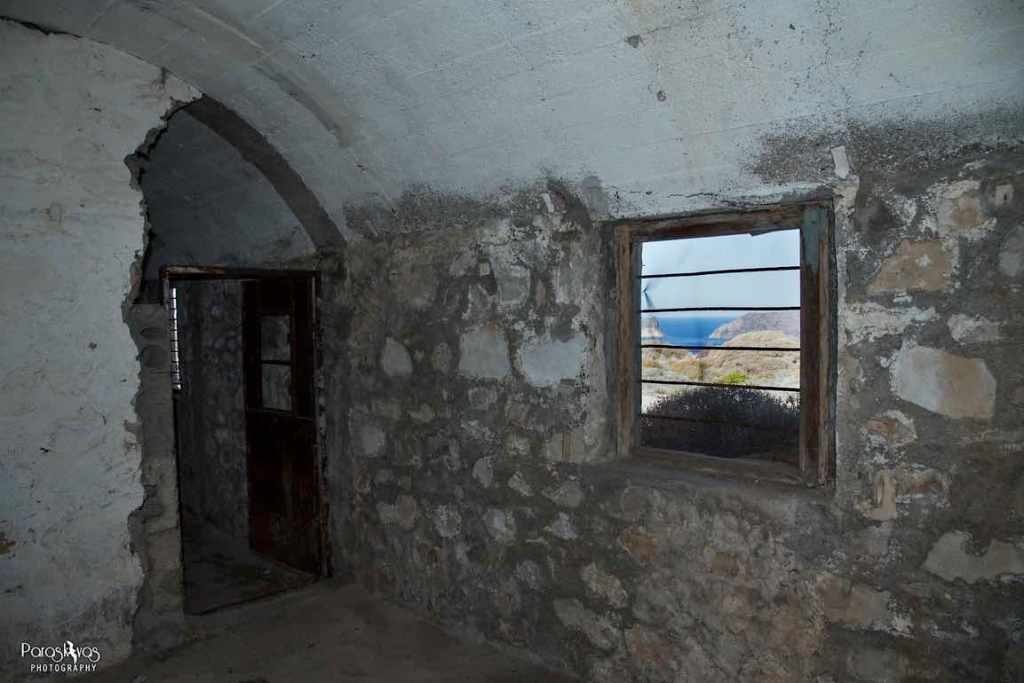
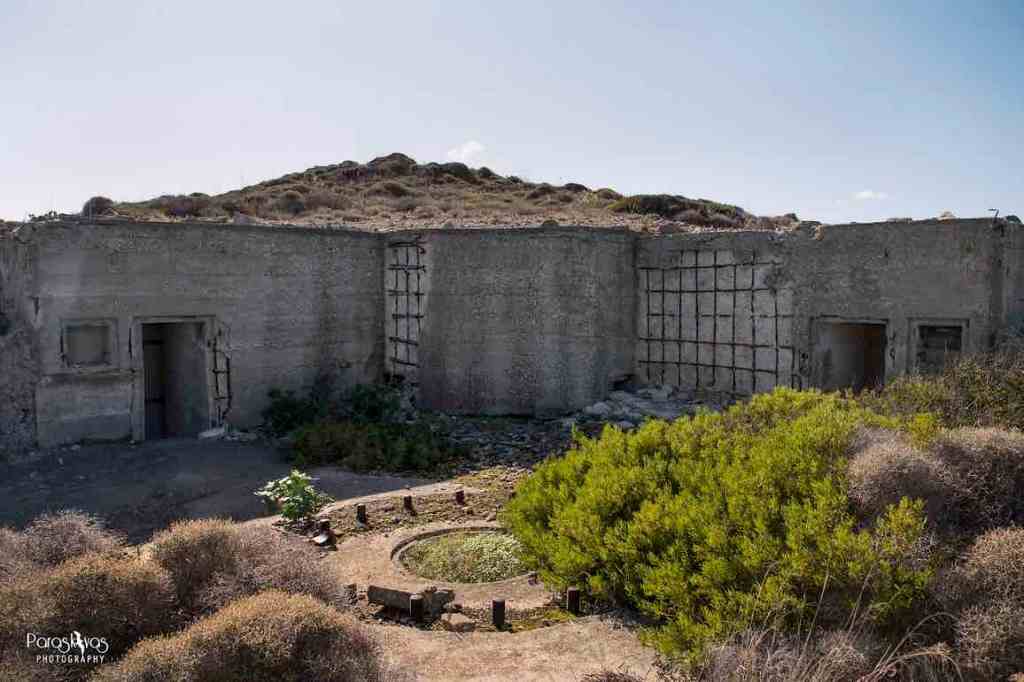
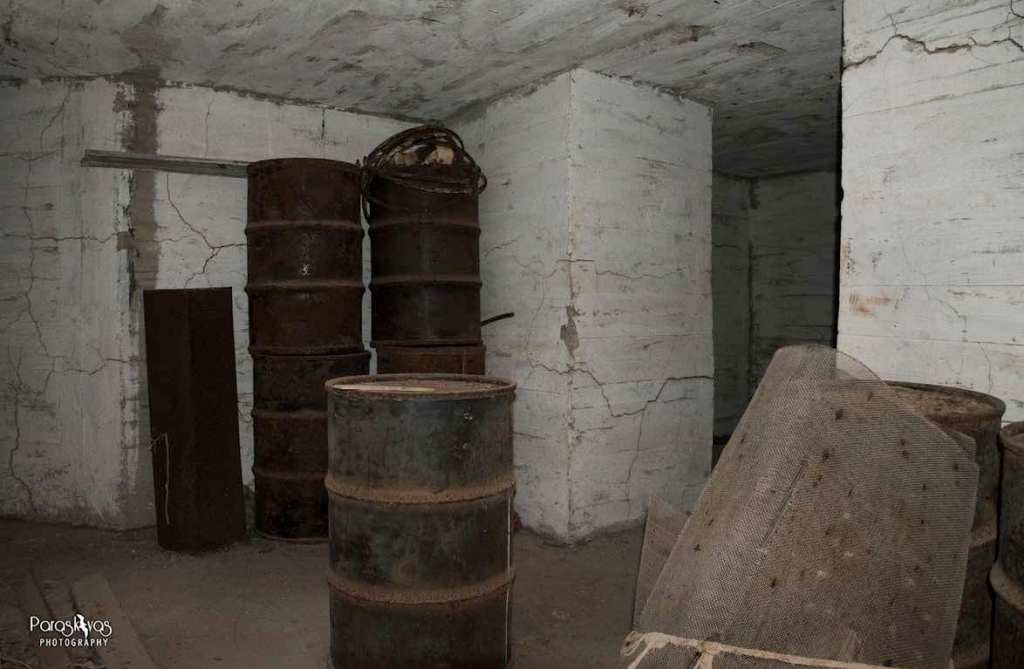
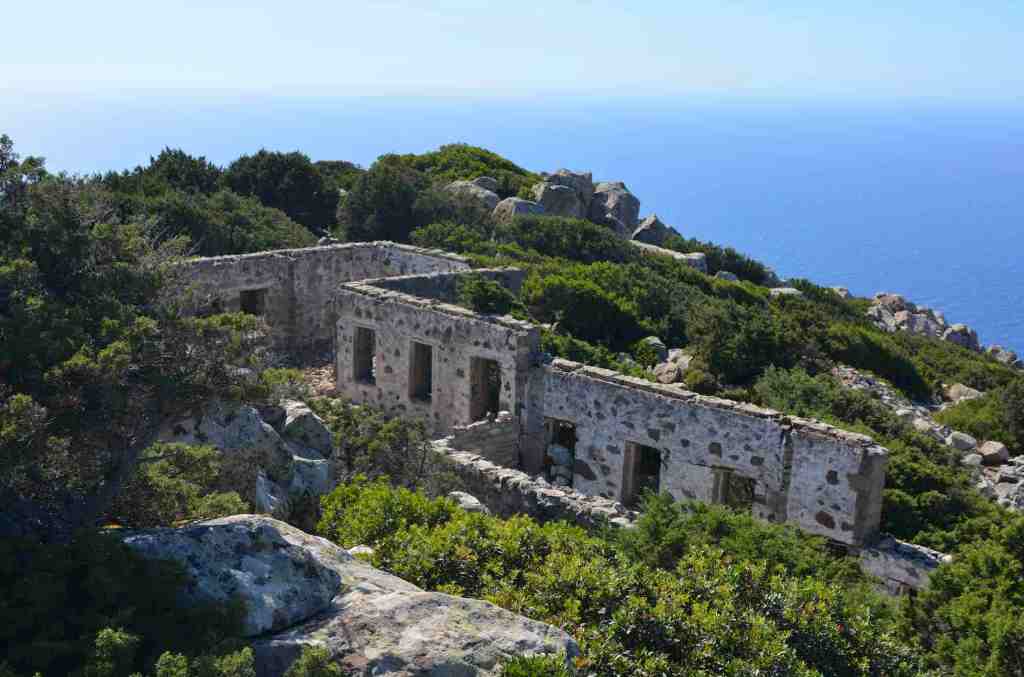
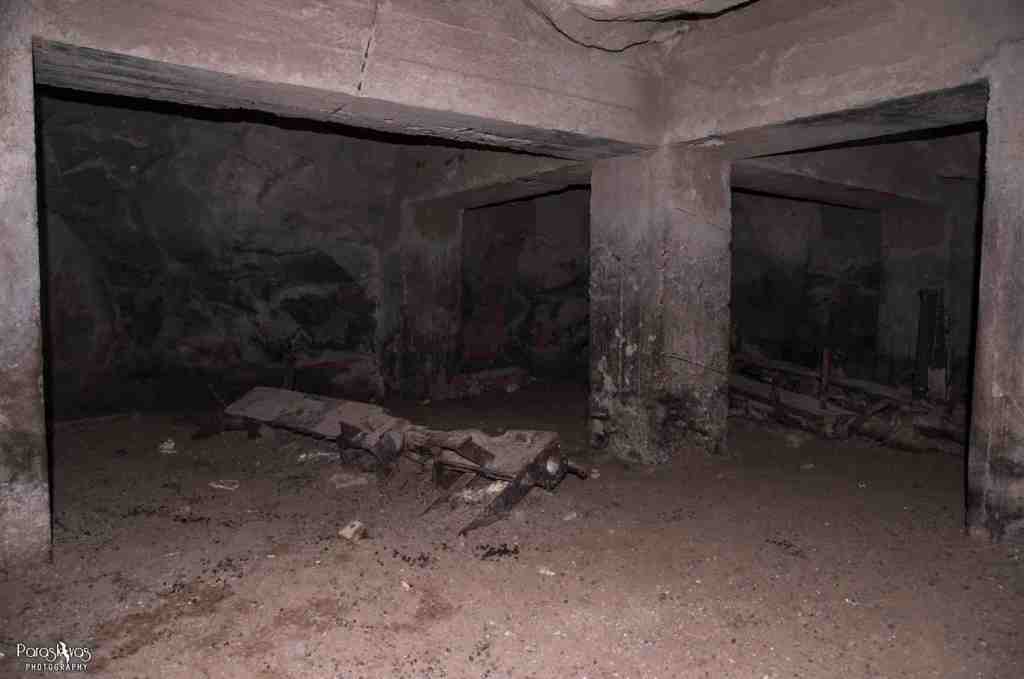
REACHING TOPAKAS TODAY is an off-the-beaten-path adventure, demanding sturdy boots and an adventurous spirit. A small wooden sign on a bend past the secluded Agios Ioannis monastery serves as the starting point. The trail, woven through low scrubs, intersects with goat paths and runoff furrows, eventually merging with the sinuous sweeps of a Wehrmacht service road etched into the mountainside. While parts of its stony edges endure, much is obscured by thorny bushes, complicating the journey. The climb intensifies, leading to the craggy summit. The ‘road’ abruptly ends, seemingly in the middle of nowhere. As you navigate around colossal boulders, the roofless, one-story Deutsche Kriegsmarine barracks materialise, indicating that your last few steps have taken you on a time journey to the past. Exploration unveils an elevated anti-aircraft gun position and an adjacent bunker at the summit. The breathtaking panorama of the brilliantly blue Aegean leaves a profound impression. From this lofty viewpoint, the now-popular Kleftiko swimming spot (an old pirate’s lair), nestled in the rugged limestone landscape at sea level, is distinctly visible. One of its small sandy coves served as a foothold during the raid. Delving into the side of Topakas is a fortified concrete bomb shelter and ammunition depot, its entrance obstructed by fallen debris. This was the refuge for the Germans when HMS Easton unleashed its barrage, effectively avoiding any German casualties. In a hollow to the south rests the corroding remnant of the Freya early warning radar unit itself. Following orders from Oberst Hans-Georg Benthack, commander of the steadfast 13,000 Germans entrenched in Fortress Crete, the unit was blown up, and the site abandoned on 18th November, a few days after the Royal Marine raid. Although the antenna array has disappeared over time, remnants of the twisted cabin and the robust tetrapod mounting endure. Adjacent to it, the abandoned axle/bogie of the radar’s mobile transport carriage, complete with bulbous mudguards, remains in situ. Scattered metal fragments, corroded bullet casings partially buried in the soil, and a lower anti-aircraft gun position with descending steps leading to a mostly dislodged ammunition bunker are found nearby. On the bunker wall, a plaque, placed by Edwin Bell in 2000, son of Capt. Arnold Bell RM, serves as a poignant tribute to the fallen Royal Marines from their ill-fated raid in November 1944.
Acknowledgements
The author would like to thank Richard Prevett and Margret Couillault (Prevett) for sharing their father’s memoirs, along with Anthea Gillian Tripp (daughter of Lt. ‘Tony’ Shipperlee) for access to her father’s flight logbook, personal letters and files. Boundless gratitude is extended to Ed Bell for his insights and contributions. Thanks also goes to Andreas Belivanakis for the retrospective interview material with Horst Seegers, Paraskevas Karvouniaris for the bunker photos under Topakas and his excellent present-day Lakida battery images and finally, Dimitri Galon for his invaluable period photographs.
Cover Photo: Paraskevas Karvouniaris ©
Delve Deeper
Your chance to investigate further elements of the story. Specifically, the official report filed by Cmdr S. H. Dennis regarding events on Milos in November 1944. Source: ADM/199/2428 Crown ©


Footnotes
- Romania changed their allegiance on 24 August 1944 to the Allied side, while Bulgaria followed shortly after on 8 September 1944.
↩︎ - The directive for a staged withdrawal from Greece is recorded in the 27th August 1944 entry of War Diary of the German Naval Staff Operations Division (pp 571-572) (post-war translation):
Confidential
The Operations Staff, Armed Forces High Command transmitted at 02:00 hrs the following directive of the Führer:
“i. Through the sudden change in Romania and also in Bulgaria the development will presumably accelerate quitting the war. On account of events, Hungary seems to look for a closer collaboration with the Reich. At present, no change in situation is perceptible in Croatia. In the first line, Bulgaria will demand withdrawal of the OKK-corps from Serbia and of the 7th Bulgarian Division from the area of Saloniki [Greece], as well as evacuation of its state area by German troops. In addition it might be possible that the Bulgarians abandon the new Bulgarian area and the coast of Tracia owing to enemy pressure.
ii. Also in a changed position it will be the task of the Commander in Chief Southeast to control the war-economic and important area of the Central Balkan and to keep open the most important communication lines of the southeastern area.
iii. To carry out these tasks the necessary forces should be obtained by shifting the Commander in Chief Southeast from south and central Greece to the areas of the central Balkan, especially endangered. To establish this, a loosening up of the occupation of the Ionian islands and of the Aegean islands as well as of the coastal section is allowed, first of all not including the larger harbours. Withdrawal of all troops and installations southerly of the line Corfu-Joanina-Kalabaka-Olymp should be prepared, reception and blocking in this line should be safeguarded.
iv. The evacuation of Reich and racial Germans from Greece as well as of non-necessary war units and offices must be completed ahead of this movement. Also, the present Italian military internees of this area should be completely transferred as far as not absolutely necessary in war important work.
v. Only absolutely necessary supplies for combat purposes should be transferred into the area south of Saloniki, supplies in advance should be postponed at once.
vi. The Navy and Air Force will adjust measures to this combat Air bases not needed more southerly of the general line Corfu-Olymp should be ruined, all other kinds of constructions should cease especially those of the Navy.
vii. Commander in Chief Southeast High Command Air and High Command Navy should report plans as soon as possible.”
↩︎ - On 26.10.44, the German Naval Staff, Operations Division War Diary records garrison strengths (for both Herr (Army Group E) and Kriegsmarine (Navy, under the command of Admiral, Aegean)) on the main occupied islands as follows: Crete with 13,694 men, Rhodos with 6,096 men, Laros with 5,040 men, Kos with 1,035 men, and Milos with 630 men. This totals 26,495 men.
↩︎ - Adamas Bay was known to the Germans as Baryt Bay, possibly because of the mineral baryte, which is an important source of barium.
↩︎ - According to the German Naval Group Command South War Diary, on 24.10.44, Army Group E ordered that “an energetic naval staff officer be appointed Island Commander on Milos.” The office of the Commanding Admiral, Aegean appointed Korvettenkapitan Bernhard Kühn, who was hastily flown by Luftwaffe floatplane from Thessaloniki to Milos the very next day. His orders: “The island garrison was to defend itself to the last shell.”
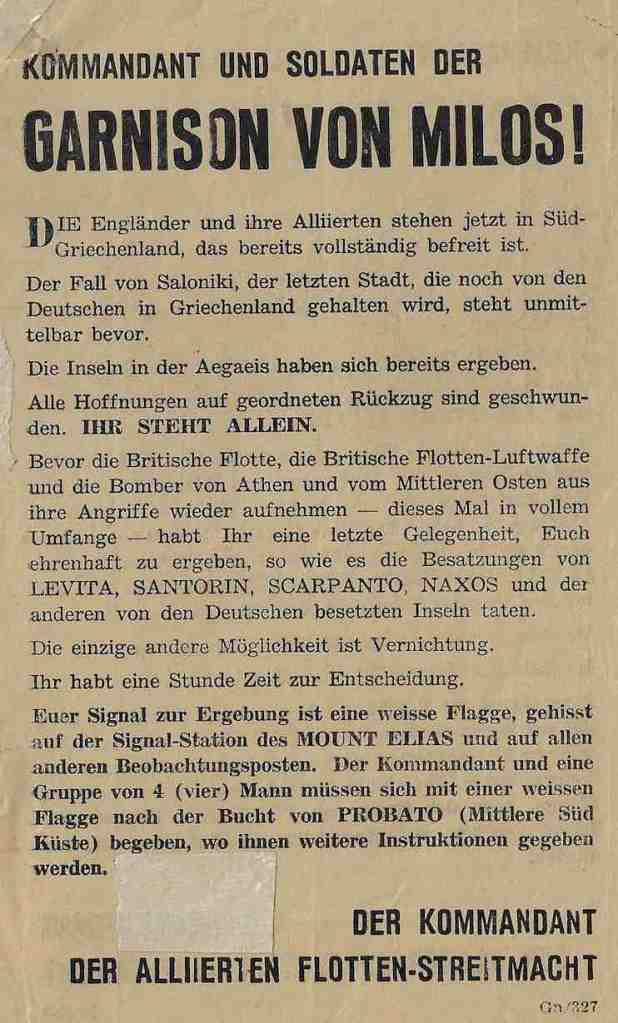
↩︎ - Leaflet translation:
COMMANDER AND SOLDIERS OF THE GARRISON ON MILOS
The English and their allies are now in southern Greece, that territory is completely liberated. The fall of Salonika, the last town still held by the Germans in Greece, is immediately impending. The islands in the Aegean have already surrendered. All hopes of orderly withdrawal have disappeared. YOU STAND ALONE
Before the British fleet, the British fleet-air-arm and the bombers from Athens and the middle east return to the attack again – this time in full force – you have a last opportunity to save your honour as the garrisons of LEVITA, SANTORIN, SCARPANTO, NAXOS and the other German-occupied islands did.
The only other possibility is annihilation.
You have only one hour to decide. Your surrender signal is a white flag hoisted on the signal station on Mount Elias, and on all other observation posts. The commandant and a group of 4 (four) men must go with a white flag to the bay of PROBATO (in the middle of the south coast), where further instructions will be given to them.
↩︎ - RAAF Sqn 459 (Martin Baltimore medium bombers Mk IV & V) was based in Berka, Libya. It flew daily bombing raids against the Lakida gun battery from 26.10.44 to 02.11.44. A typical raid comprised 6 to 8 aircraft, each with a payload of x1 450 kg (1000 lb) and x2 110 kg (250 lb) bombs. Attack was in two formations, typically flying at 2,700 m (9,000 ft). Most bombs were reported to ‘burst’ within the target area. Apart from the raid on 31.10.44, when the following was reported: “…a few seconds after fall of bombs, black smoke was seen to rise in position of predictor (100 yards inshore),” no direct hits were claimed.
↩︎ - Eight RAF Sqn 603 Beaufighters took off from Gambut III, Cyrenaica (modern Libya) on 28.10.44 to make a co-ordinated attack with FAA Sqn 800 Grumman Hellcats on enemy positions on Milos, but bad weather over Kythera and Anti-kythera forced them back. They took off again at 11.30 hrs the next day with the same mission brief, arriving at 13:50 hrs to rendezvous with the Hellcats above the aircraft carrier, HMS Emperor. Led by the Hellcats, the combined force flew over Apollonia and down the East coast of the island. At first, no heavy gun emplacements were sighted. So, they attacked anti-aircraft positions marked by their intense flak fire. One of the Beaufighters spotted a gun emplacement “concreted in the cliff” and fired. However, its RP’s (rockets) narrowly over-shot the target. Three Beaufighters attacked a ridge on which anti-aircraft fire had been seen, but no hits were reported. The planes then headed back to their respective homes, the Beaufighters returning safely to Gambut at 15:50 hrs.
↩︎ - According to the RAAF Sqn 459 Operations Book Report of 30.10.44: “Two cruisers, 1 Aircraft [carrier], one destroyer and one large M/V [Motor Vessel] and numerous landing craft were seen in the vicinity.”
↩︎ - The four turreted 150 mm (5.90-inch) guns at Lakida Point had a wide arc of fire and a range of around 23.7 km (26,000 yards). Principally directed by a large range-finder located on the vantage point of a Venetian castle in the main town of Plaka (but also possibly directed from Topakas), it could lay fire on His Majesty’s ships if they wandered too close.
↩︎ - According to Admiralty reports, the battleship HMS King George V (41) was in its way to the Pacific Theatre and under orders of the Eastern Fleet when, on 07.11.44, Flag Officer of Levant and Eastern Mediterranean, Vice Admiral William George Tennant CB, CBE, RN (who had been the Captain of HMS Repulse when it was sunk on 10.12.41 (see Footnote 12) and who was stationed at HMS Nile shore base at Alexandria (Egypt) (see Footnote 11)) asked that the battleship be diverted to Milos to undertake a bombardment of the obstinate Lakida costal battery on Milos. It was agreed, on condition that; “The ship not be taken into mineable waters, that reduced charges were used to minimise the wear of the guns, and that the number of rounds fired was strictly limited.” The bombardment was not effective. Lt John ‘Tony’ Shipperlee, who spotted for HMS King George V during the attack later commented in a personal letter that; “The gunnery on H.M.S King George V gave a disappointing performance and when back in harbour, it was learned that the gunnery officer had forgotten to ‘layoff’ the ship’s speed while adjusting aim between salvos, resulting in the shells repeatedly falling to the left of target.”
↩︎ - Undoubtedly fuelled by a blend of frustration and daring spirit, the decision to assign Haddock Troop a ‘Special Assignment’ emerged from a higher-up’s belief that the Royal Marines should actively contribute to Greece’s liberation. Commando training, focused on street fighting and riot control, commenced in August at HMS Sphinx in Alexandria, an accommodation shore base in Alexandria (Egypt) used by the Royal Navy’s Mediterranean Fleet. After the liberation of Athens on 12th October, they moved to Piraeus on the 17th, participating in ceremonial duties involving the reinstatement of the Greek Prime Minister, Georgios Papandreou, and his newly formed government in exile. However, craving more substantive action, they eagerly awaited a mission.
↩︎ - HMS Repulse (34) (Capt. William George Tennant, CB, RN) and HMS Prince of Wales (53) (Capt. John Catterall Leach, RN) were the mainstays of ‘Force Z’, a hastily assembled Royal Navy squadron sent to the Pacific in late 1941 to protect British colonial interests and act as a deterrent against possible Japanese aggression. Without the protection of air cover (its importance was not fully realised at the time), both capital ships were sunk in short order by Japanese air attack on December 10th, 1941 off the east coast of the British colony of Malaya (i.e. modern Malaysia).
↩︎ - HMS Carlisle (D67) (Capt. Harold Fielding Nalder RN) was part of ‘Credential Force’ consisting of the destroyers HMS Panther (G41), HMS Petard (G56), HMS Rockwood (L39), and RHN Miaoulis (L91). The Force had been tasked to “search and destroy German invasion forces for Leros.” It operated south of Samos and was returning to Alexandria (Egypt) when attacked by 60 JU-87s out of Megara and Argos airfields in Greece. The attack took place at 12:00 hrs 9th October 1943, five minutes after its American P-38 long-range fighter plane escort 1st Fighter Grp Mission 918 (Lt Hagenback) was ordered to leave and return to Gambut airfield Cyrenaica (modern Libya). It occurred in Scarpento Channel, between Karpathos and Rhodes in the Dodecanese. HMS Carlisle was heavily damaged (loss of 24 crew) and later had to be towed back to Alexandria, where it was repurposed as a Base Ship. HMS Panther (Lt Cdr The Viscount Jocelyn, RN) was sunk with a loss of 33 crew.
↩︎ - A total of 60 JU-87s (from I./StG 3 (Sturzkampfgeschwader 3) based at Megara (Greece) and II./StG 3 based at Argos (Greece)) attacked ‘Credential Force’ at 12:00 hrs 9th October 1943 following a sighting made at 07:50 hrs by a JU88 on a reconnaissance mission. HMS Carlisle was badly damaged and HMS Panther sunk.
↩︎ - Topakas was known to the Germans as Kapsalis, named after Cape Psalis, which marks the south-western most corner of Milos and is found on both British and German maps.
↩︎
References
Belivanakis, Gregoris. ‘Germans on Milos 1943-45,’ Athens, 2011.
German Naval Staff Operations Division War Diary (Oct.44): https://archive.org
Forces War Records: https://www.forces-war-records.co.uk
Iliopoulos, Ilias. Military History Pages. ‘Operations of the Sacred Squadron during WWII,’ Herodotos Publications, Athens 2013.
Imperial War Museum: https://www.iwm.org.uk
National Archives, UK: https://www.nationalarchives.gov.uk
Naval History: https://naval-history.net
Radar World: http://www.radarworld.org
Royal Navy Research Archive: http://www.royalnavyresearcharchive.org.uk
Royal Navy Historic Branch (Document): Operations at Milos; Recapture Prevented. Extracts 2431 to 2433, Oct./Nov. 1944.
Royal Navy Historic Branch (Document): German Signals, Milos from PG 46103 and PG 46107, Oct./Nov. 1944.
Royal Navy Historic Branch (Document): Naval Group Command (South) from PG 46087-8, Oct. 1944.
U-Boat Net: https://uboat.net
WWII Unit Histories and Officers: https://www.unithistories.com
WWII Wrecks: https://www.ww2wrecks.com
We value your opinion!
Your feedback is important to us. If you enjoyed this article and would like to see similar content, show your appreciation by clicking the ‘Claps’ icon below. Also, ensure you stay up-to-date with our latest articles by subscribing to our Newsletter. You’ll receive new posts directly to your email inbox. Thank you for your support!
‘History has to be shared to be appreciated’
Subscribe to our Mailing List. We’ll keep you in the loop.
Link to ww2stories.org home page: Return